


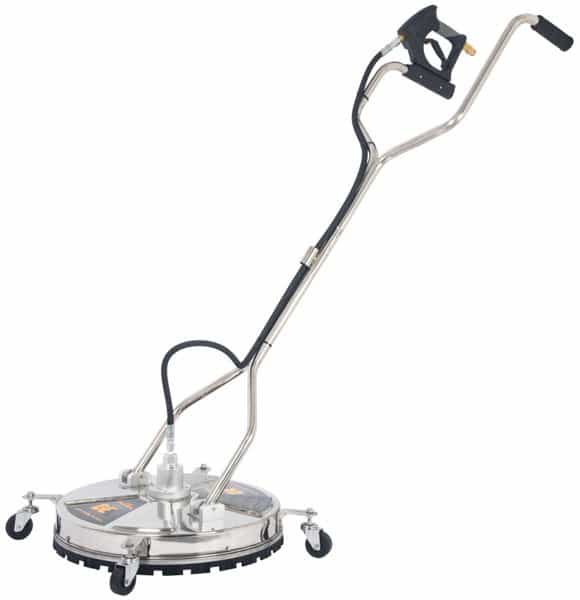
Upgrade your cleaning power with our Stainless Steel Flat Surface Cleaner, designed for use with the Smart Wash MaxForce Pressure Washer. This professional-grade accessory is engineered to deliver spotless results on a variety of flat surfaces, from concrete driveways to large patios and decks.
Crafted from premium stainless steel, this surface cleaner not only resists corrosion and rust but also ensures durability and long-lasting performance, even under the most demanding conditions. Its robust construction and high-quality materials make it ideal for both commercial and residential applications.
The wide cleaning path allows you to cover more area in less time, reducing cleaning time while achieving a consistently streak-free finish. Whether you’re a professional contractor or a homeowner looking to maintain pristine surfaces, this flat surface cleaner is your ultimate solution for achieving professional-grade results every time.
Key Features:
- Professional-Grade Construction: Made from heavy-duty stainless steel for maximum durability and longevity.
- Efficient Cleaning: Wide cleaning path for faster, more effective surface cleaning.
- Corrosion-Resistant: Stainless steel design ensures resistance to rust and corrosion.
- Compatible with Smart Wash MaxForce: Optimised for seamless integration with your MaxForce pressure washer.
Transform your pressure washing experience and take on the toughest cleaning jobs with confidence. The Stainless Steel Flat Surface Cleaner is the perfect accessory to enhance the power and efficiency of your Smart Wash MaxForce Pressure Washer.
- 276 Bar max pressure
- 30 Lpm max flow
- 20″ stainless steel cover
- On 4 castor wheels
- 80°C max operating temperature
- Trigger gun, M22 M inlet
- 2x 25° nozzles, 025, 1/4″
Using a flat surface cleaner with a pressure washer is straightforward, but following the right steps will ensure you get the best results and maintain safety. Here’s a step-by-step guide on how to use a flat surface cleaner:
1. Prepare Your Equipment
- Pressure Washer: Ensure your pressure washer is set up and connected to a water source. Check the fuel or power source depending on whether it’s gas or electric.
- Flat Surface Cleaner: Attach the flat surface cleaner to the pressure washer’s spray wand or lance. Ensure all connections are secure.
2. Inspect the Area
- Clear the area you plan to clean of any debris, such as sticks, rocks, or loose items, that could obstruct the cleaning process or damage the cleaner.
- Pre-treat heavily stained areas with a suitable cleaning solution if necessary.
3. Set the Pressure
- Adjust the pressure washer to the appropriate PSI (pounds per square inch) setting recommended for the surface you’re cleaning. Too much pressure can damage delicate surfaces, while too little may not clean effectively.
4. Start Cleaning
- Position the Cleaner: Place the flat surface cleaner on the area you want to clean. Hold the spray wand firmly with both hands.
- Begin Movement: Start the pressure washer and slowly move the surface cleaner in a side-to-side motion. Move at a steady pace to ensure even cleaning.
- Overlap Passes: Slightly overlap each pass to avoid streaks and ensure the entire surface is cleaned evenly.
5. Monitor and Adjust
- As you clean, monitor the surface for any missed spots or areas that require additional passes. Adjust your speed or pressure if needed.
- Avoid staying in one spot for too long, as this could lead to uneven cleaning or surface damage.
6. Rinse the Surface
- Once you’ve cleaned the entire area, detach the flat surface cleaner and use the pressure washer’s spray wand to rinse off any remaining dirt or cleaning solution.
7. Post-Cleaning Maintenance
- After use, disconnect the flat surface cleaner from the pressure washer and rinse it with clean water to remove any debris or residue.
- Store the flat surface cleaner in a dry place to prevent corrosion or damage.
8. Safety Tips
- Always wear appropriate protective gear, such as gloves, goggles, and non-slip shoes.
- Never point the pressure washer’s nozzle at people, pets, or yourself.
- Be cautious of slippery surfaces during and after cleaning.
By following these steps, you can effectively and safely clean large flat surfaces, achieving a professional-level finish with your flat surface cleaner.
Maintaining your flat surface cleaner is crucial for ensuring its longevity and optimal performance. Here’s a guide on how to properly maintain your flat surface cleaner:
1. Regular Cleaning After Each Use
- Rinse Thoroughly: After each use, detach the flat surface cleaner from the pressure washer and rinse it thoroughly with clean water. This helps remove any dirt, debris, or cleaning chemicals that may have accumulated during use.
- Clean the Nozzles: Check the spray nozzles for any clogs or debris. Use a small brush or a nozzle cleaning tool to clear any blockages. Clogged nozzles can reduce cleaning efficiency and put unnecessary strain on the machine.
2. Inspect for Wear and Tear
- Check Brushes and Skirt: Examine the brushes or skirt around the edge of the surface cleaner. If these components are worn out or damaged, replace them to maintain optimal cleaning performance and protect surfaces from scratches.
- Examine the Swivel and Bearings: The swivel, which allows the spray arms to rotate, and the bearings are critical components. Periodically check them for smooth operation and signs of wear. Lubricate them according to the manufacturer’s recommendations.
3. Lubrication
- Swivel Lubrication: Some flat surface cleaners require periodic lubrication of the swivel joint. Check your owner’s manual for specific instructions on how to lubricate this part. Use the recommended Lithium Complex Grease lubricant to ensure smooth rotation of the spray arms.
- Avoid Over-Lubrication: Use only the amount of lubricant specified by the manufacturer. Over-lubricating can attract dirt and debris, which might clog or damage moving parts.
4. Storage Tips
- Dry Before Storage: Make sure the surface cleaner is completely dry before storing it to prevent rust and corrosion.
- Store in a Clean, Dry Place: Store the cleaner in a dry, sheltered area away from direct sunlight and extreme temperatures. Keeping it in a controlled environment will help prevent deterioration of seals, hoses, and other components.
- Hang or Elevate: If possible, hang the surface cleaner or store it in a way that prevents pressure on the spray arms or other delicate parts. This helps maintain its shape and function.
5. Seasonal Maintenance
- Inspect Hoses and Connections: At the start of each season, inspect the hoses, connections, and fittings for signs of wear, cracks, or leaks. Replace any damaged parts to prevent operational issues.
- Test Functionality: Before your first use each season, test the surface cleaner to ensure everything is functioning correctly. Listen for any unusual noises and watch for any leaks or irregular spray patterns.
- Check for Rust or Corrosion: Inspect all metal components, especially if your surface cleaner is not made entirely of stainless steel. Clean off any rust and apply a rust inhibitor if necessary.
6. Professional Servicing
- Periodic Professional Check: Depending on the frequency of use, consider having your flat surface cleaner professionally serviced every 1-2 years. A professional can disassemble, inspect, and service internal components more thoroughly.
7. Replacement Parts
- Use Genuine Parts: Always use manufacturer-recommended replacement parts to ensure compatibility and maintain warranty coverage.
- Keep Spare Parts: Having spare nozzles, brushes, and O-rings on hand can save time if a replacement is needed during a job.
By following these maintenance steps, you’ll extend the life of your flat surface cleaner and keep it working efficiently, ensuring consistently excellent results every time you use it.

